The Consolidated Profile Editor allows you to add and modify contract profiles. Eventually this editor will replace the existing Edit Contract Profile page and allow you to edit all aspects of a contract profile, including all aspects of service types and reimbursement terms.
Note: The Consolidated Profile Editor requires special permission to access and must be enabled for your facility and your specific user ID.
For the current release, this page is limited to adding service types to a profile and editing or adding the reimbursement terms included in this help topic.
For more information about editing profiles in existing Contract Manager pages, refer to the following:
CPE Best Practices
- Add or delete all service types using the classic or multi-service type pages.
- Update all available CPE terms first, then update the remaining terms using the classic Service Type Reimbursement Editor.
- Ignore text alignment issues. They will be corrected automatically when you save the service type.
- Review complex set ups to see if they can be simplified.
- Use a text editor (such as Notepad or WordPad) to save common setups, then copy the text and paste it into CPE.
The following shortcut key combinations are available in CPE.
|
Key Combination |
Function |
Description |
|
CTRL+S |
Save |
Saves the current service type. |
|
CTRL+A |
Select All |
Selects all of the text in the term. |
|
CTRL+C |
Copy |
Copies the selected text. |
|
CTRL+X |
Cut |
Pastes the copied text. |
|
CTRL+V |
Paste |
Undoes the previous operation. |
|
CTRL+Z |
Undo |
Repeats the previous operation |
|
CTRL+Y |
Redo |
Opens the Reimbursement Term Wizard. |
|
CTRL+SPACEBAR |
Open Wizard |
Switches between the Regular and Numeric editing modes. |
|
CTRL+ALT+SPACEBAR |
Switch Mode |
Opens the Reimbursement Term Wizard. |
|
TAB |
Tab |
Allows you to tab forward to any part of the term. |
|
SHIFT+TAB |
Tab Back |
Allows you to tab backward to any part of the term. |
The following toolbar buttons are available in CPE.
|
Button |
Function |
Description |
|
|
Menu |
Allows you to switch to the Contract Profile or to the classic Service Type Reimbursement Editor. |
|
|
Regular Edit Mode |
Opens the Reimbursement Text wizard in the regular edit mode. |
|
|
Numeric Edit Mode |
Opens the Reimbursement Text wizard in the numeric edit mode. |
|
|
Delete |
Deletes the service type. |


Use the Consolidated Profile Editor
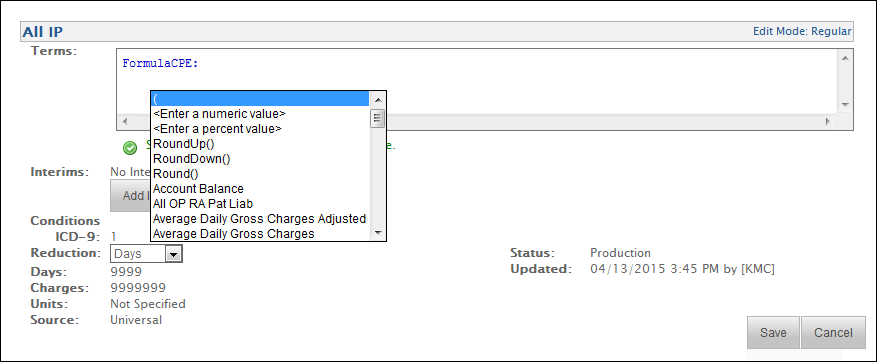
The Consolidated Profile Editor provides a variety of wizards to guide you through the process of creating different types of reimbursement terms. For the current release, this page is limited to the following types of reimbursement terms:
- If you want to make a minor change to an existing term or already know the syntax of the term you want to edit, you can type the reimbursement text in the editor window without using the Reimbursement Text wizard. For example, type $500 Flat to enter a flat amount reimbursement term of $500.
- If you need more assistance, press Ctrl+Space to access the Reimbursement Text Wizard.
- The wizard allows you to select the type of reimbursement term you want to enter and then guides you through each value you must enter for that term. Press Tab or Enter to accept a value and move to the next field.
- You can use the wizard to add multiple reimbursement terms to one service type.
- When you save your changes while using the wizard, any fields you have not specifically defined are populated with default values.
Note: When you are selecting a value from a long list, you can start typing the name of the value to limit the list to values that start with the typed characters. For example, if you are searching for a procedure code table named BLOOD PRODUCTS, you can type BL to limit the list of values to those that begin with "BL."
- If the reimbursement text you need exists in another profile (or any other text-based source), you can also copy the text from that source, double click the service type to enter the edit mode, and paste the text into the service type.
Procedure
- Access the View Contract Profile page.
- Select Go To > Contract Loading > Contract Profile Management. The Contract Profile Management page opens.
- Specify the selection criteria, and click Refresh View. The results appear.
- The contract profile must be checked out by you before you can edit the profile. For more information about checking out a profile, refer to Check Out / Check In a Contract Profile.
- For more information about searching for a contract profile, refer to Manage Contract Profiles.
- Click a link in the Contract Name column. The Edit Contract Profile page opens.
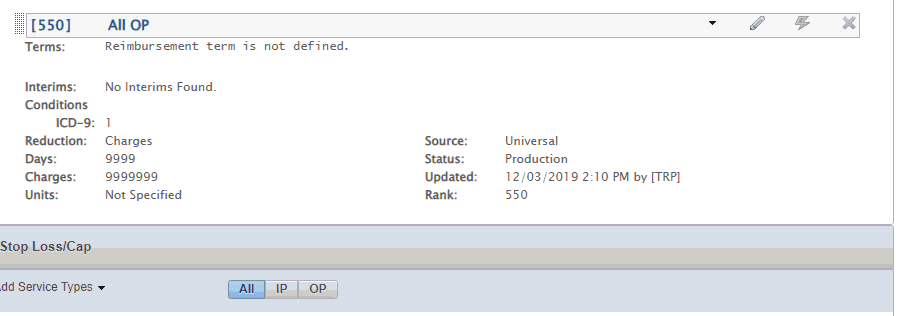
- Click Consolidated Profile Editor at the top of the page.The View Contract Profile page opens.
- Review the terms and conditions defined for the profile.
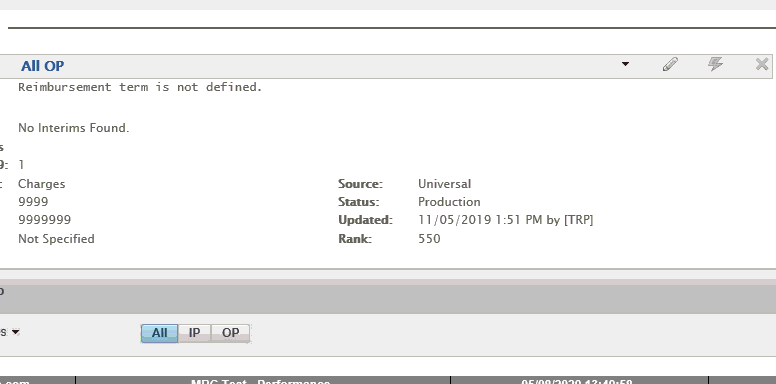
- The terms and conditions are divided into the following sections:
- Exclusions – Subtracts the expected amount for the service type from billed charges.
- Pass-Through – Adds the expected amount for the service type to the amounts in the Reimbursement section.
- Reimbursement – Pays the rate calculation calculated by the specified reimbursement method.
- Stop Loss/Cap – Overrides all calculations from previous sections with the expected amount for the service type.
- Use the
 Expand and
  Collapse icons to hide or show individual sections of the terms and conditions to make it easier to review the terms and conditions.
- Clicking Expand All or Collapse All at the top of the Terms and Conditions section hides or shows all terms and conditions sections.
- Use the buttons at the top of each section of the Terms and Conditions to hide or show service types based on patient type.
- Click IP to only show service types related to inpatient terms and conditions.
- Click OP to only show service types related to outpatient terms and conditions.
- Click All to show all service types.
- Click the Service Type header to collapse or expand the Service Type.
- All Patient Types and Service Types are expanded when users open the contract profile in CPE.
- Click +/- to expand or collapse the service types for the patient type.
- To return to the original Edit Contract Profile page, click the down arrow in the header line for the service type and select Contract Profile. The Edit Contract Profile page opens. For more information about this page, refer to Edit a Contract Profile. You can also click the contract name link at the top of the page to return to the Edit Contract Profile page.
- The terms and conditions are divided into the following sections:
- To edit the reimbursement of an existing service type:
- Click
 to enter the Regular Edit Mode for the selected service type.
 - If you want to make a minor change to a reimbursement term or already know the syntax of the term you want to edit, you can type the reimbursement text in the editor window without using the Reimbursement Text wizard. For example, type $500 Flat to enter a flat amount reimbursement term of $500.
- If you need more assistance, press Ctrl+Space to access the Reimbursement Text Wizard.
- The wizard allows you to select the type of reimbursement term you want to enter and then guides you through each value you must enter for that term.
- Press Tab or Enter to accept a value and move to the next field. Press Shift + Tab to return to the previous value.
- When you are selecting a value from a long list, you can start typing the name of the value to limit the list to values that start with the typed characters. For example, if you are searching for a procedure code table named BLOOD PRODUCTS, you can type BL to limit the list of values to those that begin with "BL."
- Click Save or press Ctrl+S to save your changes.
- When you save your changes, any fields you have not specifically defined are populated with default values.
- To exit the editor without saving your changes, click Cancel or press Esc.
- If the reimbursement term has never been created, the reimbursement text reads, "Click here to add reimbursement text."
- If the reimbursement text you need exists in another profile (or any other text-based source), you can copy the text from that source and paste it into the editor.
- If you need more assistance, press Ctrl+Space to access the Reimbursement Text Wizard.
- Click
- To edit dollar amounts, multipliers, or percentages for a service type:
- Click
 to enter the Numeric Edit Mode for the selected service type.
 - Press Ctrl+Space to enter the Numeric Edit Mode.
- Type a number to enter an amount, multiplier, or percentage for a service type.
- Press Tab or Enter to accept a value and move to the next numeric field. Press Shift + Tab to return to the previous value.
- Click Save or press Ctrl+S to save your changes.
- When you save your changes, any fields you have not specifically defined are populated with default values.
- To exit the Numeric Edit Mode without saving your changes, click Cancel or press Esc.
- To add an Interim Value that you can name and then use in calculations within the profile, click AddInterim Value. For more information, refer to Update Service Type – Interim Value.
- Edit the desired service type details.
- The service type details display at the bottom of each service type, including the condition, status, reduction, last updated date, and source as well as the days, charges, and units expressions.
- You can edit the following fields from this page:
- Reduction – Option to reduce charges by either days, charges, or neither days or charges.
- Reduce gross charges prior to discount – Option to determine whether gross charges are reduced prior to applying any discount.
- Continue processing other service types after this one – Option to determine whether processing should stop or continue after this service type.
- To show or hide these values outside of the edit mode, click the service type name.
- Click
- To add a service type:
- Click Add Service Types in one of the Terms and Conditions sections. The Add Service Types window opens and displays a list of all available service types.
- The details for each service type, such as patient type, condition, and reduction display in this window to make it easier to distinguish between similarly named service types.
- You cannot move a service type from one section to another after it is created. For example, you cannot move a Reimbursement service type into the Exclusions section.
Note: Beginning with release 16.1.0, the Consolidated Profile Editor page allows you to add local service types that were previously associated with the contract service types. For more information, refer to Associate a Service Type Definition Table with a Contract Profile.
- To add a service type, click the service type name.
- When you click a service type, the service type name is added to the Selected Field Names list.
- You can hover over the service type name in the Selected Field Names list to review the details for each service type, such as patient type, reduction, condition, and effective date.
- To remove a service type, click the name in the Selected Field Names list. The service type is moved back to the list of available service types.
- You can add multiple service types at the same time by adding each service type to the Selected Field Names list.
- You can also search for a specific service types by typing the service type name in the Search field. For example, to search for Cardiac Services, type Cardiac in the Search field.
- When you have selected all of the service types you want to add to your profile, click Apply. The Add Service Types window closes, and your selected service types display in your profile.
- If you add a service type through Consolidated Profile Editor, the default values are automatically applied for all fields except Name and Rank.
- To modify any values not editable on this page, refer to Edit a Service Type Definition Table or Add a Service Type to a Contract Profile.
- To access the term editor and modify additional details for a service type, click the down arrow in the header line for the service type and click Term Designer. The Service Type Reimbursement Editor page opens. For more information about this page, refer to Define Reimbursement for a Service Type.
- Click Add Service Types in one of the Terms and Conditions sections. The Add Service Types window opens and displays a list of all available service types.
- Use either of the following methods to change a service type rank:
- Click to enter the Regular Edit Mode for the selected service type, then edit the Rank value and click Save.
- Click the handle to the left of service type or interim value name and hold down the mouse button as you drag the item to the desired location.
- The position of the service type on the View Contract Profile page determines its rank. The reimbursement calculation moves through the service types in sequential order from the top of the page to the bottom. Each service type has a higher priority than the service type below it. For more information about ranking, refer to Contract Profiles.
- You cannot change service type ranking if any service type in the profile is in the edit mode.
Note: The CPE page displays the original rank and the override rank for each service type. The original rank does NOT display when you are in the edit mode.
- Click
- To delete a service type, click
 next to the service type name. The service type is removed from the profile, and an option to undo the delete appears.
- To undo the delete and add the service type back to the profile, click Undo.
- To remove the undo option, refresh the page.
The Interim Value term allows you to assign a name to a value or calculation, such as a dollar amount, percentage, number, formula, or date. This named value is then available as a selection in the Update Service Type – Formula and Update Service Type – FormulaCPE reimbursement terms to make it easier to create complex formulas. This term is typically used for complex stop loss terms.
Syntax Notes
Note: You can use any of the available reimbursement terms to create your interim value.
|
Interims: |
Interim Value Name:
{Gross Charges} * 80% |
Procedure
- Click to enter the Regular Edit Mode.
- Click Add Interim Value to enter interim values.
Note: To edit an existing interim value, click the reimbursement text for the interim value you want to edit.
- Type a name for the interim value in the Name field.
Note: The name you enter is available for selection in the Formula reimbursement term when inserting an interim value.
- Press Tab.
- Press Ctrl+Space to access the Reimbursement Text wizard.
- If you want to make a minor change or already know the syntax of the value you want to edit, you can type the reimbursement text in the editor window. For example, you can type $50 Flat rather than using the wizard.
- Press Tab or Enter to accept a value and move to the next field. Press Shift + Tab to return to the previous value.
Note: The reimbursement term list displays after you complete the last field, allowing you to add another reimbursement term to this service type.
- Optionally, select another reimbursement term and complete the fields as prompted.
- Click Save or press Ctrl+S to save your changes.
- To use an interim value in another term, select (Enter an interim value) from the Reimbursement Text wizard.
- If there is only one interim value defined for your profile, that value is automatically selected. If there are multiple interim values defined, you can select from a list of all available interim values.
- The use of interim values is currently limited to the Formula term.
The DRG Lookup term calculates reimbursement for hospital contracts based on a diagnosis related group (DRG) weight table.
Syntax Notes
- The DRG Table Name reference DRG weight tables, it does not reference procedure lookup tables containing DRG codes.
- In Conversion Price, do not type a dollar sign ($).
- Use a decimal to express a dollar amount, such as 7039.70. You are not required to use a decimal for a whole dollar amount, such as 7040.
|
Terms: |
DRG Lookup: DRG Table Name: [APR DRG] Conversion Price: $10.00 |
Procedure
- Click to enter the Regular Edit Mode.
- Press Ctrl+Space to access the Reimbursement Text wizard.
- If you want to make a minor change or already know the syntax of the term you want to edit, you can type the reimbursement text in the editor window. For example, you can change the DRG Table Name or the Conversion Price without using the wizard.
- Press Tab or Enter to accept a value and move to the next field. Press Shift + Tab to return to the previous value.
- Select DRG Lookup.
- Select the DRG Table Name.
- Type the Conversion Price dollar amount.
- Optionally, select another reimbursement term.
- Click Save or press Ctrl+S to save your changes.
Note: Click the DRG Table Name in the completed term to view the lookup table.
The Flat Amount term calculates a flat reimbursement dollar amount when the service type appears on the claim. You typically use this tool for case-based services.
Syntax Notes
- The syntax for this term is the dollar amount, with the dollar sign, followed by the word Flat. For example, $50.00 Flat.
- Decimals are only required for non-whole dollar amounts. For example, you must type the decimal for $3600.55, however, for $3600.00, the decimal and cents are not required.
|
Terms: |
|
Procedure
- Click to enter the Regular Edit Mode.
- Press Ctrl+Space to access the Reimbursement Text wizard.
- If you want to make a minor change or already know the syntax of the term you want to edit, you can type the reimbursement text in the editor window. For example, you can type $50 Flat rather than using the wizard.
- Press Tab or Enter to accept a value and move to the next field. Press Shift + Tab to return to the previous value.
- Select $ Amount.
- Type the flat reimbursement dollar amount.
- Select Flat. The "Syntax valid" message displays.
Note: The reimbursement term list displays after you complete the last field, allowing you to add another reimbursement term to this service type.
- Optionally, select another reimbursement term.
- Click Save or press Ctrl+S to save your changes.
The Formula term allows you to use multiple factors to create compound calculations that you cannot create in other terms.
Syntax Notes
- Each line in the Formula term is limited to two values and one operator. The result of that calculation can then be added to, subtracted from, divided by, or multiplied by a second line. For example, the following text in the Formula term is calculated as follows:
Expected Payment - (Insurance Payment + Patient Payment).
|
Formula: {Expected Payment} Then Subtract {Insurance Payment} + {Patient Payments} End Formula |
- To complete a formula, you must select End Formula. Your term text is not valid until the End Formula statement is added.
- Decimals are only required for non-whole amounts. For example, you must type the decimal for 300.5, however, for 300.0, the decimal and following zero are not required.
- Mathematical functions are performed in the order they appear on the page, rather than following standard order of mathematical operations.
Note: The Update Service Type – FormulaCPE term was introduced in release 15.2. You can continue to use and edit existing Formula terms, but use Update Service Type – FormulaCPE to define new terms.
Procedure
- Click to enter the Regular Edit Mode.
- Press Ctrl+Space to access the Reimbursement Text wizard.
- If you want to make a minor change or already know the syntax of the term you want to edit, you can type the reimbursement text in the editor window without using the Reimbursement Text wizard.
- Press Tab or Enter to accept a value and move to the next field. Press Shift + Tab to return to the previous value.
- Select Formula.
- Select the first value for your formula.
- To enter a numeric value rather than selecting a value from the available database fields, select (Enter a numeric value) and type the value in the text field.
- To enter a percentage value rather than selecting a value from the available database fields, select (Enter a percent value) and type the value in the text field.
- To select an interim value defined within the current contract profile, select (Enter an interim value).
Note: If there is only one interim value defined in the profile, that value is automatically selected. If there are multiple interim values defined, select the desired value from the list of available interim values. For more information, refer to Update Service Type – Interim Value.
- Select a mathematical operator, such as plus (+), minus (-), divided by (/), multiplied by (*), or modulus.
- Modulus finds the remainder of division between two numbers. For example, 7 modulus 5 = 2. This is because 7 divided by 5 = 1 with a remainder of 2.
- Select the next value for your formula.
- To add an additional line to your formula:
- Select one of the following to determine the mathematical operation to perform between the result of the current line and the result of the following line:
- Then Add
- Then Subtract
- Then Multiply By
- Then Divide By
- Then Round – Rounds the result to the nearest whole number according to standard rounding logic (.5 or greater rounds up to the next highest whole number and less than .5 rounds down to the next lowest whole number)
- Then Round Down – Rounds the result to the next lowest whole number
- Then Round Up – Rounds the result to the next highest whole number
- Repeat steps 4 through 6.
- Select one of the following to determine the mathematical operation to perform between the result of the current line and the result of the following line:
- When all lines of your formula have been added, select End Formula.
Note: The reimbursement term list displays after you select End Formula, allowing you to add another reimbursement term to this service type.
- Optionally, select another reimbursement term and complete the fields as prompted.
- Click Save or press Ctrl+S to save your changes.
Use the FormulaCPE term to create formulas with any number of operators and operands.
|
FormulaCPE: ({Charges In Service Type} - {Charges In Exclusions Section} - {Charges In Pass-Through Section}) * 60.00% End FormulaCPE |
Syntax Notes
- You can enter formulas as free-form text in one or more lines, or use the wizard to enter a formula.
- You can enter an “unlimited” number of operands and operators on a single line.
- The view mode breaks up a one line formula into multiple lines if the formula length exceeds 96 characters.
Note: Parenthesis blocks may be displayed on separate lines when needed.
- The FormulaCPE term can include an interim term as an operand.
- Interims can be defined using the FormulaCPE term.
- You cannot use special characters (+-*/()=/'|\\<>) or existing FormulaCPE operands as the interim name.
- The FormulaCPE term supports Round, Round Up, and Round Down functions.
- The FormulaCPE term supports the traditional mathematical operator precedence.
- Parenthesis
- Round, RoundUp, RoundDown
- *, /, Modulus
- +, -
- The FormulaCPE term allows multiple levels of parentheses to override operator precedence rules.
- Multiplication and division operators take precedence over addition and subtraction, so the following formula multiplies 4*5, then it adds 3 to the product:
3+4*5 = 23
- Use parentheses to override the operator precedence and change the result of the formula:
The following formula adds 3 + 4 first, then it multiplies the sum by 5:
(3+4)*5 = 35
- The FormulaCPE term supports parallel and nested parentheses:
Parallel: 3*(4+5) + (8-7)/6
Nesting: (({Account Balance} + 100)*50% + 70)
Note: The wizard provides multiple options for closing parentheses.
- To complete a formula, you must select End Formula. Your term text is not valid until the End Formula statement is added.
- Decimals are only required for non-whole amounts. For example, you must type the decimal for 300.5, however, for 300.0, the decimal and following zero are not required.
Note: The FormulaCPE term was introduced in release 15.2. You can continue to use and edit existing Update Service Type – Formula terms, but use FormulaCPE to define new terms.
Procedure
- Click to enter the Regular Edit Mode.
- Press Ctrl+Space to access the Reimbursement Text wizard.
- If you want to make a minor change or already know the syntax of the term you want to edit, you can type the reimbursement text in the editor window without using the Reimbursement Text wizard.
- Press Tab or Enter to accept a value and move to the next field. Press Shift + Tab to return to the previous value.
- Select FormulaCPE.
- Select the first value for your formula.
- Select ( to use parentheses to override operator precedence rules.
- The FormulaCPE term allows multiple levels of parentheses to override operator precedence rules.
- The wizard provides options to close the parentheses where appropriate within the term.
- Select <Enter a numeric value> to enter a numeric value:
- Type the numeric value in the text field.
- Press Enter.
Note: Enter a decimal point where needed.
- Select <Enter a percent value> to enter a percentage value.
- Type the percentage value in the text field.
- Press Enter.
Note: Enter a decimal point where needed. You do not have to enter the % symbol.
- Select an interim value if needed.
Note: To add an interim value defined within the current contract profile, click Add Interim Value.
- If there is only one interim value defined in the profile, that value is automatically selected.
- If there are multiple interim values defined, select the desired value from the list of available interim values.
- For more information, refer to Update Service Type – Interim Value.
- Select a mathematical operator, such as plus (+), minus (-), divided by (/), multiplied by (*), or modulus.
- Select RoundUp() to round the result to the next highest whole number.
- Select RoundDown() to round the result to the next lowest whole number.
- Select Round() to rounds the result to the nearest whole number according to standard rounding logic.
- .5 or greater rounds the result up to the next highest whole number and
- Less than .5 rounds the result down to the next lowest whole number)
- Select Modulus to find the remainder of division between two numbers. For example, 7 modulus 5 = 2. This is because 7 divided by 5 = 1 with a remainder of 2.
Note: The FormulaCPE term supports the traditional mathematical operator precedence except for where parentheses () are used as overrides.
- Select the next value for your formula.
Note: The wizard provides options to close the parentheses where appropriate within the term.
- Repeat as needed until all elements of the term have been entered.
- When all lines of your formula have been added, select End FormulaCPE.
Note: The reimbursement term list displays after you select End FormulaCPE, allowing you to add another reimbursement term to this service type.
- Optionally, select another reimbursement term and complete the fields as prompted.
- Click Save or press Ctrl+S to save your changes.
The Greater Of term lets you limit the results of reimbursement terms to the greater of two or more specified values by reimbursing based on the highest amount calculated by the terms grouped.
Syntax Notes
- When you select Greater Of as your reimbursement term, you can then select a term to define the calculation. All available reimbursement terms can be grouped together in a sum.
- When you complete the definition of the term, you can select End Greater Of to complete the term, or you can select Or to consider another term.
|
Terms: |
Greater Of: $500.00 Flat Or: 60% of Charges in Service Type End Greater Of |
Procedure
- Click to enter the Regular Edit Mode.
- Press Ctrl+Space to access the Reimbursement Text wizard.
- Select Greater Of.
- Select the type of term you want to define in your Greater Of term.
- Press Tab or Enter to accept a value and move to the next field.
- Press Shift + Tab to return to the previous value.
- Define the values for the first term in your Greater Of term.
- To add a term to your Greater Of term, select Or and define the values for the desired term.
- When all terms are completely defined, select End Greater Of to complete the Greater Of term.
Note: The reimbursement term list displays after you select End Greater Of, allowing you to add another reimbursement term to this service type.
- Optionally, select another reimbursement term and complete the fields as prompted.
- Click Save or press Ctrl+S to save your changes.
Note: Added a new CurrentDailyAmount() operand to the If term in the Consolidated Profile Editor. Use this operand to calculate and compare daily amounts between reimbursement terms rather than the concatenated amount.
The If term qualifies a statement to determine how reimbursement is calculated. A statement can have two or more operands.
Syntax Notes
- The If term is only used to set a condition or comparison for a following calculation – it does not calculate reimbursement.
- You can enter a calculation within the If term using all of the operands available in CPE.
- You can use interims within the If term.
- You can define interims that include If terms.
- You cannot use special characters (+-*/()=/'|\\<>) or existing If operands as the interim name.
- You can create multiple levels of reimbursement terms within the Then and Else expressions.
- Select Next Term to add a new term (or type a semicolon if you are entering the term manually).
- Select Else to add a new condition.
Note: The reimbursement term list displays after you select End If or Next Term, allowing you to add another reimbursement term to this service type. Each term is separated by a semicolon.
- You can create nested If terms within the Then and Else expressions.
- The If term supports the traditional mathematical operator precedence.
1. Parenthesis
2. Round, RoundUp, RoundDown
3. *, /, Modulus
4. +, -
The If term allows multiple levels of parentheses to override operator precedence rules.
- Multiplication and division operators take precedence over addition and subtraction, so the following formula multiplies 4*5, then it adds 3 to the product:
- 3+4*5 = 23
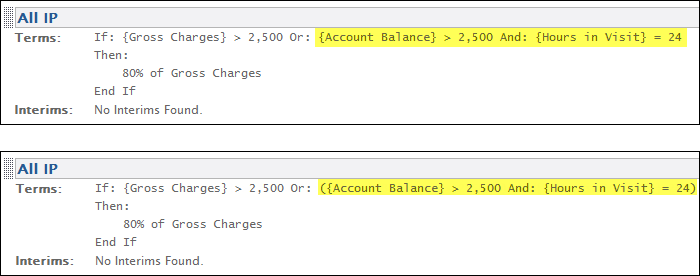
- The logical operators And and And Not have precedence over Or and Or Not. Use parentheses to override the operator precedence and change the result of the term.
- The If term supports parallel and nested parentheses:
Parallel: 3*(4+5) + (8-7)/6
Nesting: (({Account Balance} + 100)*50% + 70)
Note: The wizard provides multiple options for closing parentheses.
Use the CurrentDailyAmount() operand to calculate and compare daily amounts between reimbursement terms rather than the concatenated amount.
- The CurrentDailyAmount() operand is initially available only for the Procedure Lookup reimbursement term.
- You can currently only reference Interim Values after this operand.
- The interim values must use the CPE procedure look up term with the Process Daily Amount set to Yes.
When you complete the definition of the If term, you can select End If to complete the term, Else to add another condition, or Next Term to add a new term.
Procedure
- Click to enter the Regular Edit Mode.
- Press Ctrl+Space to access the Reimbursement Text wizard.
- If you want to make a minor change or already know the syntax of the term you want to edit, you can type the reimbursement text in the editor window without using the Reimbursement Text wizard.
- Press Tab or Enter to accept a value and move to the next field. Press Shift + Tab to return to the previous value.
- Select If.
- Select the first value for your If term.
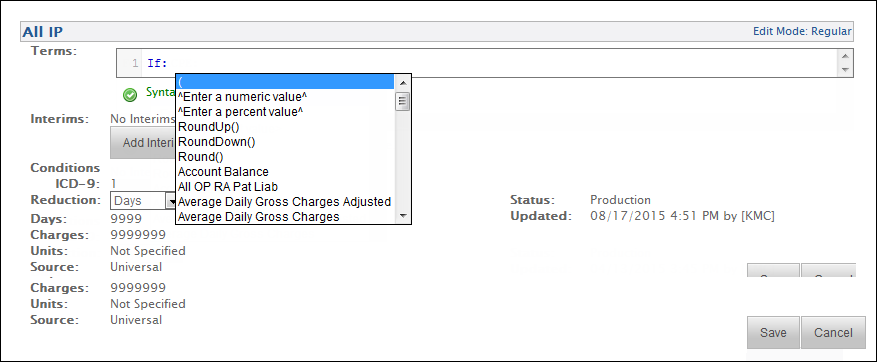
Select ( to use parentheses to override operator precedence rules.
The logical operators And and And Not have precedence over Or and Or Not.
The following terms have the same order of precedence.
Use parentheses to override the operator precedence and change the result of the term.

The wizard provides options to close the parentheses where appropriate within the term.
- Select <Enter a numeric value> to enter a numeric value:
- Type the numeric value in the text field.
- Press Enter.
Note: Enter a decimal point where needed. Decimals are only required for non-whole amounts. For example, you must type the decimal for 300.5, however, for 300.0, the decimal and following zero are not required.
- Select <Enter a percent value> to enter a percentage value.
- Type the percentage value in the text field.
- Press Enter.
Note: Enter a decimal point where needed. You do not have to enter the % symbol.
- Select an interim value if needed.
Note: To add an interim value defined within the current contract profile, click Add Interim Value.
- If there is only one interim value defined in the profile, that value is automatically selected.
- If there are multiple interim values defined, select the desired value from the list of available interim values.
- For more information, refer to Update Service Type – Interim Value.
- Select a mathematical operator, such as plus (+), minus (-), divided by (/), multiplied by (*), or modulus.
- Select RoundUp() to round the result to the next highest whole number.
- Select RoundDown() to round the result to the next lowest whole number.
- Select Round() to rounds the result to the nearest whole number according to standard rounding logic.
- .5 or greater rounds the result up to the next highest whole number and
- Less than .5 rounds the result down to the next lowest whole number)
- Select Modulus to find the remainder of division between two numbers.
Note: The If term supports the traditional mathematical operator precedence except for where parentheses () are used as overrides.
- Select the next value for your If term.
Note: The wizard provides options to close the parentheses where appropriate within the term.
- Repeat as needed until all elements of the term have been entered.
- When you complete the definition of the If term, you can select End If to complete the term, Else to add another condition, or Next Term to add a new term.
- Select Else to add a new condition.
- Select Next Term to add a new term.
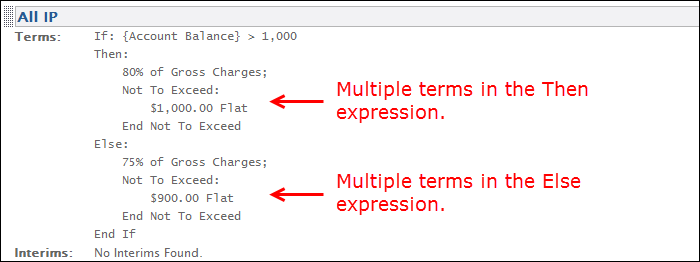
Note: The If term allows multiple levels of reimbursement terms within the THEN and ELSE expressions. The reimbursement term list displays after you select End If or Next Term, allowing you to add another reimbursement term to this service type.
- Click Save or press Ctrl+S to save your changes.
The Lesser Of term lets you limit the results of reimbursement terms to the Lesser of two or more specified values by reimbursing based on the lowest amount calculated by the terms grouped.
Syntax Notes
- When you select Lesser Of as your reimbursement term, you can then select a term to define the calculation. All available reimbursement terms can be grouped together in a sum.
- When you complete the definition of the term, you can select End Lesser Of to complete the term, or you can select Or to consider another term.
|
Terms: |
Lesser Of: $100.00 Flat Or: 60% of Charges in Service Type End Lesser Of |
Procedure
- Click to enter the Regular Edit Mode.
- Press Ctrl+Space to access the Reimbursement Text wizard.
- Select Lesser Of.
- Select the type of term you want to define in your Lesser Of term.
- Press Tab or Enter to accept a value and move to the next field.
- Press Shift + Tab to return to the previous value.
- Define the values for the first term in your Lesser Of term.
- To add a term to your Lesser Of term, select Or and define the values for the desired term.
- When all terms are completely defined, select End Lesser Of to complete the Lesser Of term.
Note: The reimbursement term list displays after you select End Lesser Of, allowing you to add another reimbursement term to this service type.
- Optionally, select another reimbursement term and complete the fields as prompted.
- Click Save or press Ctrl+S to save your changes.
The Price To Zero On Error term is used for Inpatient service type, All IP, Medicaid reimbursement term for South Carolina (SC) Medicaid APR-DRG.
The Price To Zero On Error option automatically appears with a setting of N (no). With a setting to N (no), the total expected reimbursement amount equals to 100% of billed charges for accounts that encounter a fatal error when pricing.
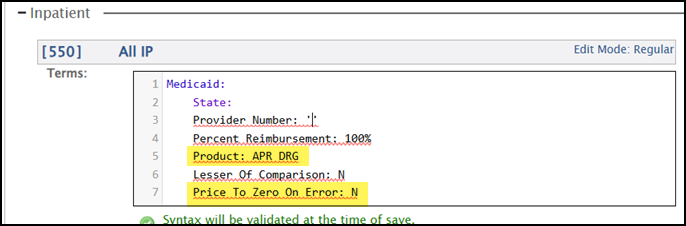
When you select Y (yes), this option reflects a total expected reimbursement amount of $0.00 for accounts that encounter a fatal error when pricing.
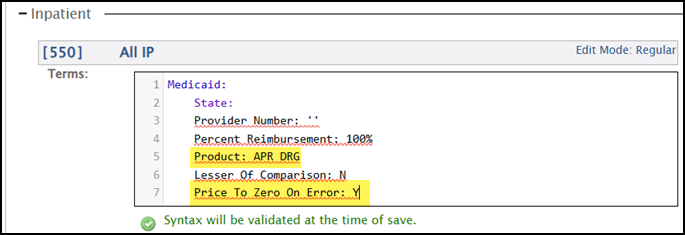
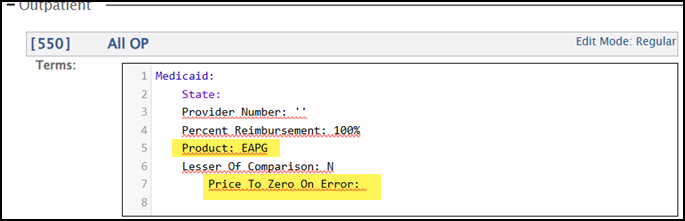
If the Price To Zero On Error option is not listed, use Control Key + Space Bar to insert this option.
The Price To Zero On Error term is used for Outpatient service type, All OP, Medicaid reimbursement term for the following:
- Colorado (CO) Medicaid EAPG
- District of Columbia (DC) Medicaid EAPG
- Nebraska (NE) Medicaid EAPG
- Virginia (VA) Medicaid EAPG
The Price To Zero On Error option automatically appears with a setting of N (no). With a setting to N (no), the total expected reimbursement amount equals to 100% of billed charges for accounts that encounter a fatal error when pricing.
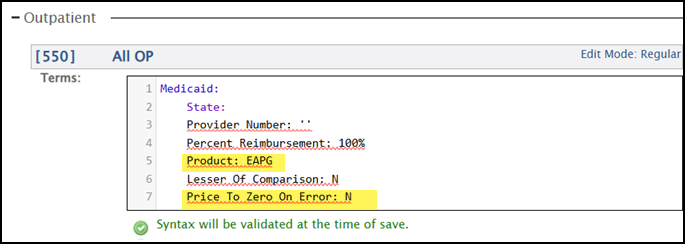
When you select Y (yes), this option reflects a total expected reimbursement amount of $0.00 for accounts that encounter a fatal error when pricing.
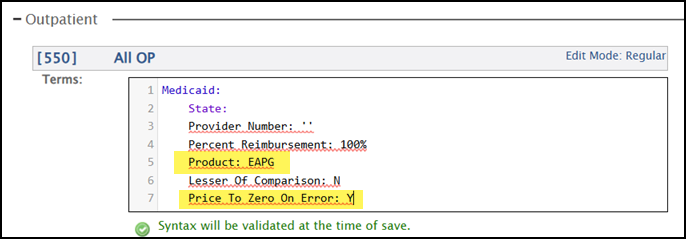
If the Price To Zero On Error option is not listed, use Control Key + Space Bar to insert this option.
The Not To Exceed term allows you to limit the results of reimbursement terms to a specified value. Limiting calculations to 100% of billed charges is typical for most contracts, but some providers may pay at an amount that is less than billed charges.
Syntax Notes
- When you select Not To Exceed as your reimbursement term, you can then select a term to define the calculation. All available reimbursement terms can be grouped together in a sum.
- When you complete the definition of the term, End Not To Exceed displays to complete the term.
|
Terms: |
Not To Exceed: 80% of Charges in Service Type End Not To Exceed |
Procedure
- Click to enter the Regular Edit Mode.
- Press Ctrl+Space to access the Reimbursement Text wizard.
- Select Not To Exceed.
- Select the type of term you want to define in your Not to Exceed term.
- Press Tab or Enter to accept a value and move to the next field.
- Press Shift + Tab to return to the previous value.
- Define the values for the first term in your Not To Exceed term.
Note: The reimbursement term list displays after you complete the last field, allowing you to add another reimbursement term to this service type.
- Optionally, select another reimbursement term and complete the fields as prompted.
- Click Save or press Ctrl+S to save your changes.
The Note term in the Consolidated Profile Editor combines the functions of the classic Manual Entry and Note reimbursement terms. Use this term to provide information abut the service type or to clarify reimbursement details. You can also flag the account for review or stop the claim from being repriced.
|
Terms: |
Note: "Review reimbursement amount." Processing Action: Flag for review |
Procedure
- Click to enter the Regular Edit Mode.
- Press Ctrl+Space to access the Reimbursement Text wizard.
- If you want to make a minor change or already know the syntax of the term you want to edit, you can type the reimbursement text in the editor window.
- Press Tab or Enter to accept a value and move to the next field. Press Shift + Tab to return to the previous value.
- Select Note.
- Type the note text and press Enter.
- Select the Processing Action:
- Note Only – Provides information about a service type. You typically use this tool to clarify the reimbursement details or to indicate that a service type is not reimbursable.
- Flag for review -– Flags the claim, assigns message code 0004 to the claim and places the claim on the Exception Worklist.
- Stop Calculation – Stops calculating the claim and assigns message code 0003 to the claim. The Claim Master table is updated with the claim data, but the Bill Master table is not.
- Click Save or press Ctrl+S to save your changes.
The Per Diem Amount term calculates the reimbursement dollar amount per day of service.
- The syntax for this term is the dollar amount, with the dollar sign, followed by the words Per Diem. For example, $500.00 Per Diem.
- Decimals are only required for non-whole dollar amounts. For example, you must type the decimal for $3600.55, however, for $3600.00, the decimal and cents are not required.
|
Terms: |
|
Procedure
- Click to enter the Regular Edit Mode.
- Press Ctrl+Space to access the Reimbursement Text wizard.
- If you want to make a minor change or already know the syntax of the term you want to edit, you can type the reimbursement text in the editor window. For example, you can type $500 Per Diem rather than using the wizard.
- Press Tab or Enter to accept a value and move to the next field. Press Shift + Tab to return to the previous value.
- Select $ Amount.
- Type the per diem reimbursement dollar amount.
- Select Per Diem. The "Syntax valid" message displays.
Note: The reimbursement term list displays after you complete the last field, allowing you to add another reimbursement term to this service type.
- Optionally, select another reimbursement term and complete the fields as prompted.
- Click Save or press Ctrl+S to save your changes.
The Percentage reimbursement term calculates reimbursement based on a percentage of a specified value.
The syntax for this term is the percentage amount, with the percent sign, followed by one of the following values:
- of Charges in Service Type
- of Gross Charges Adjusted
- of Gross Charges
- of Plan Liability
For example, 80% of Gross Charges.
Do not convert whole percentages into decimals. For example, for 80%, type 80. If you type .80, the system calculates .8%.
|
Terms: |
|
Procedure
- Click to enter the Regular Edit Mode.
- Press Ctrl+Space to access the Reimbursement Text wizard.
- If you want to make a minor change or already know the syntax of the term you want to edit, you can type the reimbursement text in the editor window. For example, you can type 80% of Gross Charges rather than using the wizard.
- Press Tab or Enter to accept a value and move to the next field. Press Shift + Tab to return to the previous value.
- Select % Percent.
- Type the reimbursement percentage.
- Select one of the following options:
- of Charges in Service Type
- of Gross Charges Adjusted
- of Gross Charges
- of Plan Liability
The “Syntax valid” message displays.
Note: The reimbursement term list displays after you complete the last field, allowing you to add another reimbursement term to this service type.
- Optionally, select another reimbursement term and complete the fields as prompted.
- Click Save or press Ctrl+S to save your changes.
The Procedure Code Reimbursement term calculates reimbursement for codes in one or more procedure lookup tables and modifier tables.
- This reimbursement term can reference the following code types:
- CPT4
- HCPC
- NDC
- Revenue
- When selecting a table, make sure you select the right table with the right code type. All Universal tables are available.
- If you specify a multiplier and set a percentage reimbursement for a lookup table, the system multiplies those percentages together.
The multiplier does not override a percentage reimbursement from the table.
- Do not convert whole percentages into decimals. For example, for 80%, type 80. If you type .80, the system calculates .8%.
- The name of each procedure code table and revenue code table is a link that opens the Select Lookup Table page. This page allows you to review summary information about the table or drill down to more detailed information.
|
Terms: |
|
Procedure
- Click to enter the Regular Edit Mode.
- Press Ctrl+Space to access the Reimbursement Text wizard.
- If you want to make a minor change or already know the syntax of the term you want to edit, you can type the reimbursement text in the editor window without using the Reimbursement Text wizard.
- Press Tab or Enter to accept a value and move to the next field. Press Shift + Tab to return to the previous value.
- Select Procedure Lookup.
- Select a procedure code table.
- Typing the name of the table filters the list as you type. For example, typing A limits the list to all available tables that begin with A.
- Use Ctrl + Click or Shift + Click to select multiple procedure codes at one time. If you select multiple codes, place your cursor after each procedure code and press Ctrl + Space to enter the amount/percent and other variables for that code.
- Select one of the following options to define reimbursement for the procedure codes within the selected table:
- $ Amount – Allows you to define a flat dollar amount reimbursement for codes in the selected procedure code table(s).
- Select Per Unit to apply the reimbursement dollar amount to each unit rather than to each occurrence of the procedure code.
- % Percent – Allows you to define a percentage reimbursement for codes in the selected procedure code table(s).
- Select of Table to reimburse codes in the procedure code table at a percentage of the base rate in the table.
- Select of Charges to reimburse codes in the procedure code table at a percentage of the charges on the claim.
- Select Per Unit to apply the reimbursement percentage to each unit rather than to each occurrence of the procedure code.
- Conversion Factor – Allows you to define the conversion factor used to calculate reimbursement.
- Select of Table to apply the conversion factor to the base rate in the table.
- Select of Charges to apply the conversion factor to the charges on the claim.
- $ Amount – Allows you to define a flat dollar amount reimbursement for codes in the selected procedure code table(s).
- To include a revenue code table, select Revenue Code Table and select the desired table.
- Adding a revenue code table indicates the defined reimbursement is only applied when a procedure code in the selected procedure code table appears on the claim with a revenue code in the selected revenue code table.
- To add an additional procedure code table to the term, select Procedure Code Table. Repeat the steps above to define reimbursement for the selected procedure code table.
- When all procedure code tables are defined, select Multipliers.
- A multiplier applies a percentage to the base amount in the table or charges.
- Select None if you do not want to apply a percentage multiplier.
- Select % Percent to apply a percentage to the base amount in the table or charges. You can define different percentages for multiple occurrences of the code. For example, entering 100%, 75%, 50% applies 100% to the first occurrence, 75% to the second occurrence, and 50% to the third occurrence.
- Select Limited to limit the number of codes reimbursed to the number of multipliers defined. In the example above of 100%, 75%, 50% if you select Limited, the fourth matching code is not reimbursed. If you do not select Limited the fourth and all remaining matching codes have the 50% multiplier applied.
- When multiple multipliers are entered, the of PE RVU and Per Procedure options are available. The Per Procedure requires both a Per Unit reimbursement and more than one multiplier.
- Select Sort By to define the reimbursement order.
- Allowed Amount to reimburse the allowed amount.
- Table Amount - Highest to reimburse the code with the highest reimbursement first.
- Table Amount - Lowest to reimburse the code with the lowest reimbursement first.
- Charges to reimburse the code with the highest charges first.
- RVU - Highest to reimburse the highest RVU first.
- RVU - Lowest to reimburse lowest RVU first.
- Per Unit Amount - Highest to provide the must accurate reimbursement when a contract is negotiated with multiple procedure reductions based on an amount per unit.
- None to reimburse codes in the order in which they appear on the claim.
- Select one of the following conditions:
- Select Limit reimbursement to limit the line item charges to a percentage of the charged amount. Enter the percentage amount.
- Select Do not limit reimbursement to calculate the reimbursement without a line item limit.
- Select the rule for handling duplicate codes. When duplicates are found you can choose to use one of the following:
- First Code Found
- Lowest Reimbursement
- Highest Reimbursement
- Select if you want this term to consume charges.
- This option defaults to consume charges (Y).
- The option to not consume charges is used for contract carve outs.
- Select if you want this term to consume units.
- This option defaults to consume units (Y).
- The option to not consume units is used for contract carve outs.
- Select if you want a zero amount to be treated as not found.
- This option defaults to No (N).
- When you select Y, this option ignores codes that have a base amount of $0.00.
- Select if you want to apply Modifier 50 rules.
- This option defaults to No (N).
- When you select Y, this option applies rules to adjust Modifier 50 (Bilateral) procedures to ensure that these modifiers are priced correctly.
- Select if you want to apply LSS reimbursement.
- This option defaults to No (N).
- When you select Y, this option applies the limited, second, and subsequent (LSS) edits according to the LSS schedule.
- The “Syntax valid” message displays.
Note: The reimbursement term list displays after you complete the last field, allowing you to add another reimbursement term to this service type.
- Optionally, select another reimbursement term and complete the fields as prompted.
- Click Save or press Ctrl+S to save your changes.
The Sum term allows you to add together the results of multiple reimbursement terms to come up with one value.
- When you select Sum as your reimbursement term, you can then select the first term to add to your sum. All available reimbursement terms can be grouped together in a sum.
- When you complete the definition of a term in your sum, you can select End Sum to complete the sum term, or you can select Plus to add an additional term to your sum.
|
Terms: |
Sum: $3,431.00 Per Diem Plus: Procedure Lookup: Procedure Code Tables: [TableName] $500 Per Unit Multipliers: None Sort By: Charges Conditions: Do not limit reimbursement When duplicate code found in Procedure Consume Charges: Y Consume Units: Y Treat zero Procedure Code Table amount Apply Mod50: N LSS reimbursement: N End Sum |
Procedure
- Click to enter the Regular Edit Mode.
- Press Ctrl+Space to access the Reimbursement Text wizard.
- Select Sum.
- Select the type of term you want to add as the first term in your Sum term.
- Press Tab or Enter to accept a value and move to the next field.
- Press Shift + Tab to return to the previous value.
- Define the values for the first term in your Sum term.
- To add an additional term to your Sum term, select Plus and define the values for the desired term.
- When all terms are completely defined, select End Sum to complete the Sum term.
Note: The reimbursement term list displays after you select End Sum, allowing you to add another reimbursement term to this service type.
- Optionally, select another reimbursement term and complete the fields as prompted.
- Click Save or press Ctrl+S to save your changes.
The Tier Reimbursement term allows you to define flat or per diem reimbursement based on the days in a length of stay. For example, you can define reimbursement for a service type that reimburses $300.00 per day for the first three days, $200.00 per day for the next three days, and $100.00 per day for each additional day.
Note: Decimals are only required for non-whole dollar amounts. For example, you must type the decimal for $3600.55, however, for $3600.00, the decimal and cents are not required.The multiplier does not override a percentage reimbursement from the table.
|
Terms: |
Tier: Day(s) 1 - 4: $600 Per Diem Day(s) 5 - 7: $400 Per Diem Remaining Days: $300 Per Diem |
Procedure
- Click to enter the Regular Edit Mode.
- Press Ctrl+Space to access the Reimbursement Text wizard.
- If you want to make a minor change or already know the syntax of the term you want to edit, you can type the reimbursement text in the editor window without using the Reimbursement Text wizard.
- Press Tab or Enter to accept a value and move to the next field. Press Shift + Tab to return to the previous value.
- Select Tier.
- Type 1 in the Day(s) text field to define your first day range.
- Select End Day and type the last day in your first day range in the text field.
- For example, to enter a range of 1 - 4 days, select End Day and type 4.
- If you do not want to define a range because the reimbursement changes on the second day of the stay, skip this step to define reimbursement for a single day.
- Select Exact to define and "exact day range or skip this step to define a continuous day range.
Using exact day ranges defines the total reimbursement for a length of stay that matches the specified range. For example, the following syntax example reimburses a total of $1600.00 ($400.00 per day) for a four day stay:
1 - 2 Exact : $500 Per Diem
3 - 4 Exact : $400 Per Diem
Using continuous ranges defines the reimbursement for each segment of the stay. For example, the following syntax example reimburses a total of $1800.00 ($500.00 per day for the first two days and $400.00 per day for the next two days) for a four day stay:
1 - 2 Exact : $500 Per Diem
3 - 4 Exact : $400 Per Diem
- Select Reimbursement to define the reimbursement for the specified day or day range.
- Type the reimbursement dollar amount.
- Select one of the following:
- Flat – Calculates a flat reimbursement dollar amount when the service type appears on the claim.
- Per Diem – Calculates the reimbursement dollar amount per day of service.
- To enter an additional day range, select Range, type the first day of the next day range in the Day(s) text field, and repeat Steps 5 through 9.
- When all ranges are defined, select Remaining Days to define the reimbursement for any additional days not covered by the defined ranges.
- Type the reimbursement dollar amount for the remaining days.
- Select one of the following:
- Flat – Calculates a flat reimbursement dollar amount when the service type appears on the claim.
- Per Diem – Calculates the reimbursement dollar amount per day of service.
Note: The reimbursement term list displays after you complete the last field, allowing you to add another reimbursement term to this service type.
- Optionally, select another reimbursement term and complete the fields as prompted.
- Click Save or press Ctrl+S to save your changes.
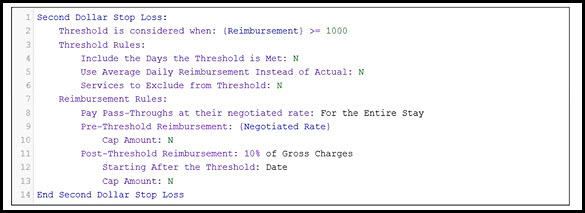
Second Dollar Stop Loss is used once the threshold is met, the payor pays one amount (generally the negotiated per diems or case rates) up to and/or including the threshold date and a different rate for the days/changes after the threshold.
The following framework allows you to define a reimbursement term to include Second Dollar Stop Loss.
|
Terms: |
|
Procedure
- Click to enter the Edit Mode: Regular.
- Press Ctrl+Space to access the Reimbursement Text wizard.
- If you want to make a minor change or already know the syntax of the term you want to edit, you can type the reimbursement text in the editor window without using the Reimbursement Text wizard.
- Press Tab or Enter to accept a value and move to the next field. Press Shift + Tab to return to the previous value.
- Select Second Dollar Stop Loss.
- A drop down appears for Threshold is considered when:.
- Make the appropriate selection (Gross Charges, Gross Charges Adjusted, Gross Charges less Exclusion, Gross Charges less Pass throughs, Original Days in Visit, or Reimbursement).
- Select > (greater than), >= (greater than or equal to), or = (equal to).
- Enter the value for Threshold is considered when:.
- Use the following for Threshold Rules. This section updates to the appropriate rule prompts based on the selection made for Threshold is considered when:.
- For Include the Days the Threshold is Met, make the appropriate selection of either N (No) or Y (Yes).
- For Use Average Daily Charges Instead of Actual, make the appropriate selection of either N (No) or Y (Yes).
- For Exclude Non-billable Charges from Threshold Day Calculation, make the appropriate selection of either N (No) or Y (Yes).
- Services to Exclude from Threshold defaults to N (No). Make the appropriate selection from the drop down list when you need to exclude service types. The list is based on the reimbursement section and pass-through section. Multiple service types can be utilized from this drop down list. Click on a previously selected service type and select Remove to remove the service type from the contract profile.
- Use the following for Reimbursement Rules:
- For Pay Pass-Through at their negotiated rate:, make the appropriate selection of N/A, For the Entire Stay, Never, or Only to Threshold Date.
- For Pre-Threshold Reimbursement, make the appropriate selection of Negotiated Rate or $ Amount.
- When Negotiated Rate is selected, enter the amount.
- When $ Amount is selected, enter the amount and make the appropriate selection of Flat or Per Diem.
- For Post-Threshold Reimbursement, make the appropriate selection of either $ Amount, % Percentage, or interim value. Enter the value. For more information on adding an interim value, refer to Update Service Type – Interim Value.
- When % Percentage is selected for Post-Threshold Reimbursement, select one of the following options:
- of Gross Charges Adjusted
- of Gross Charges
- of Gross Charges less Exclusions
- of Gross Charges less Pass Throughs
- of Negotiated Rate
- Interim value (see Update Service Type – Interim Value for additional information on adding interim values)
Note: The above list depends on previous selections.
- For Starting After the Threshold, make the appropriate selection of either Value or Date.
- For Cap Amount , make the appropriate selection of N, $ Amount, or % Percentage. Enter the appropriate value if $ Amount or % Percentage is selected.
- When capping at an amount, a drop down appears for Compare Daily. Make the appropriate selection of either N (No) or Y (Yes).
- When capping at a percentage, a drop down appears for Cap Amount > Starting After the Threshold.
- Make the appropriate selection if the percentage starts after the threshold amount Value or the threshold Date.
- For Compare Daily, make the appropriate selection of either N (No) or Y (Yes).
- When % Percentage is selected for Post-Threshold Reimbursement, select one of the following options:
- Optionally, select another reimbursement term and complete the fields as prompted.
- Click Save or press Ctrl+S to save your changes.
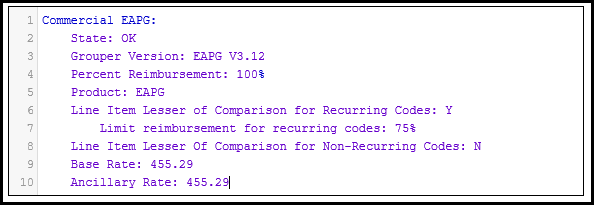
The Commercial EAPG term is designed to enable grouping and pricing of Oklahoma Blue Cross Blue Shield.
The new tool has been created to replace the original APG/EAPG term for grouping and pricing Oklahoma BCBS. For this reason, the Commercial EAPG term includes functionality that is not included in the original APG/EAPG term. The added functionality includes:
- Pricing capability to evaluate the lessor of the EAPG payment or 75% of billed charges for recurring services.
- Separate entry fields to specify different values for Base and Ancillary rates required for versions 3.15 and 3.12.
Note: See Consolidated Profile Editor (CPE) Commercial EAPG Term for additional information.
The following framework allows you to define a reimbursement term to include Commercial EAPG.
|
Terms: |
|
Procedure
- Click to enter the Edit Mode: Regular.
- Press Ctrl+Space to access the Reimbursement Text wizard.
- If you want to make a minor change or already know the syntax of the term you want to edit, you can type the reimbursement text in the editor window without using the Reimbursement Text wizard.
- Press Tab or Enter to accept a value and move to the next field. Press Shift + Tab to return to the previous value.
- Select Commerical EAPG.
- A drop down appears for Grouper Version: and Payfile:. Make the appropriate selection. Press Tab or Enter to accept a value.
- If Grouper Version: is selected, select the appropriate grouper EAPG V3.15, EAPG V3.12, or EAPG V3.8 (recommended method).
- If Payfile: is selected, enter the provider number associated with the grouper version.
- Percent Reimbursement defaults to 100%. Update as needed.
- Product populates with EAPG.
- A drop down appears for Line Item Lesser of Comparison for Recurring Codes:.
- Select Y to specify that lines qualifying as Recurring services according to Exhibit J, calculating the lesser of the EAPG reimbursement or 75% of the billed charges for that line.
- If you select N, the term does not perform any evaluations and calculates 100% of the EAPG reimbursement for that line. (Not recommended for OK BCBS).
- A drop down appears for Line Item Lesser of Comparison for Non-Recurring Codes:
- Select N to specify that lines not qualifying as Recurring services according to Exhibit J to calculate 100% of the EAPG reimbursement for that line.
If you select Y, the term calculates the lesser of the EAPG reimbursement or 100% (or whatever percentage value is specified) of the billed charges for that line.
- A drop down appears for Base Rate:.
- When using the Grouper Version option, select <Enter a numeric value> for the Base Rate (recommended).
- Specify the negotiated rate specified in the contract in the field provided.
- When using the Payfile option, select Default as 1.
- When using the Grouper Version option, select <Enter a numeric value> for the Base Rate (recommended).
- A drop down appears for Ancillary Rate:.
- When using the Grouper Version option (recommended), use one of the following:
- For Version 3.8 and the Ancillary field, enter the same value as the Base Rate.
- For Version 3.12 and the Ancillary field, there is a different negotiated rate from the Base Rate.
- For Version 3.15 and the Ancillary field, there is a different negotiated rate from the Base Rate.
- When using the Payfile option, select Default as 1.
- When using the Grouper Version option (recommended), use one of the following:
- Optionally, select another reimbursement term and complete the fields as prompted.
- Click Save or press Ctrl+S to save your changes.
Click image to play video and click video to close.