Advanced Account Research
The Account Research feature allows you to create worklists based on specified criteria to locate specific types of accounts, such as suspected underpayments, accounts with specific DRGs, and so on. The limitation of this feature is that each worklist is facility-specific. To identify similar types of accounts in multiple facilities, you must create a separate worklist in each facility.
The Advanced Account Research feature is an optional feature that overcomes this limitation and allows you to generate Account Worklists and Product Summary Worklists across any or all of the facilities that you have access to. You can create a single worklist with data from any combination of the facilities in your organization.
The Advanced Account Worklist is a powerful tool for following up on accounts. This worklist allows you to view the account number, DRG, billed charges, actual/expected total payments, actual/expected total discounts, and other information for all accounts in the selected facilities that meet your worklist criteria. Each account appears as a line item in the worklist, from which you can drill down to account details.
The Account Worklist allows you to specify criteria used to search for a specific claims or types of claims. The search can be general or very specific, depending on the selected criteria. For example, you can use the Account Worklist to find suspected underpayments, for daily reporting, or for specific account searches. You can also generate daily, monthly or quarterly reports that can be exported to a Microsoft Excel, .csv, or text file.
The Advanced Product Summary Worklist is similar to the Account Worklist, but it summarizes all accounts by product. Typically, you use the Product Summary Worklist to identify the payor with the largest underpayments and then research the source or cause of the underpayments.
The Worklist Summary compares expected and actual payments or discounts (or other parameters you can select) for a product as a whole. Each product appears as a line item in the summary that allows you to link to a more details Account Worklist, if necessary.
Note: The Product Summary Worklist is only available for production and audit worklists. You cannot view a product summary for model worklists.
The Product Match Summary Worklist is identical to the Product Summary Worklist with one important difference. If your results include accounts for a given product that are all repriced against the same contract profile effective date, these two summary pages are identical. However, if your results include accounts for a given product that are repriced against multiple contract profile effective dates, the two summary pages display the results differently.
When your results include multiple effective dates for one product, the Product Summary Worklist shows each product as a line item in the summary, adding the results for all effective dates together. The Product Match Summary, however, displays the results for each effective date as a separate line item. Each product name is a link that lets you view an account worklist limited to the accounts for the selected product and contract profile effective date.
A master account is an aggregate of all the accounts that share the same account number. For example, you can view the individual account details for an inpatient claim and a vaccine claim for the same account number, but you can also view the billed charges, expected reimbursement, discount variance, and so on for these accounts combined into one master account.
When multiple accounts are present, one account is designated as the primary account. The primary account is determined as the account with the highest expected reimbursement. For fields that do not display a combined calculation, such as DRG, Bill Type, and Reprice Type, the value for the primary account displays.
The Account Research page contains a Worklist History section that provides a list of all the worklists you have recently created and the current status of each. This allows you to easily review and download all of your worklists from one central location. From this page, you can also quickly review the criteria used to create the worklist as well as modify the criteria and re-execute the worklist when you need to.
Because you are creating worklists across multiple facilities with much larger data sets than for a single facility, these worklists can take longer to execute. In the Multiple-Facility Account Research feature, your worklists are queued up to run in the background so you don’t have to wait for a worklist to complete before you can do other work in the system. When your worklist completes, the status is updated on the Account Research page, but the system also sends you an email to let you know it is complete.
Note: Any worklist you create is only saved in the History section for 24 hours from the last time it was executed. If you have worklists that you run on a regular basis, you should save the criteria you use to create them as a Worklist Filters so you can execute those worklists any time you want without having to manually recreate them.
Worklist filters allow you to save the selection criteria for any worklist you create so you can execute the same worklist again in the future without having to manually create the criteria. Filters are never removed from the system unless you manually delete them, so they are always available. You can execute or modify a saved filter any time directly from the Account Research page.
Once an issue is identified, you can “flag” accounts in order to keep record of status and action against an account. The following are typical reasons for flagging one or multiple accounts:
- Notations of follow-up on underpayments
- Suspected errors
- To note an internal billing procedure
Contract Manager Professional maintains a history of all flag comments on accounts. Once a comment is saved, no one can edit, delete or overwrite it.
The Assign/Update Collection Information page allows you to flag accounts and update flag information for accounts in a single facility. For more information, refer to Assign/Update Invoice Collection Information.
The Advanced Account Worklist page allows you to flag accounts and apply user codes and comments to accounts across multiple facilities at one time. For more information refer to View the Account Worklist.
Many of the pages in Advanced Account Research limit the number of rows that can be displayed on a single page. When the number of rows exceeds the maximum for a single page, the results are broken into multiple pages and a navigation bar appears at the bottom of the page.

The page you are currently viewing is highlighted  , and the following navigation buttons allow you to move to specific portions of your worklist.
|
|
Displays the next sequential page |
|
|
Displays the previous sequential page |
|
|
Displays the first page in your results |
|
|
Displays the last page in your results |


To jump to a specific page in your results, click the page number you want to view.
A filter icon  in the header of a column indicates you can filter your results by that column. In other words, you can modify the current display to only show results that meet your filter criteria for that column. For example, you can filter a worklist so that it only shows accounts for a specific plan name.
Applying a filter does not remove the original data from your worklist, it only modifies the current view. You can click Clear Filter in the Filter window at any time to return to the complete data set in your worklist. For example, if you filtered your worklist to only show accounts with a plan name of Medicare, you can click Clear Filter to see all available accounts again.
To filter your results by a specific column:
- Click the Filter icon in the column header. The Filter window opens.
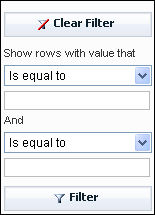
- Select one of the following values from the list:
- Is equal to – Limits the results displayed to values in the selected column that exactly match the name you enter. For example, selecting this option for the Name column and typing Lone Star would exclude names such as Lone Star PPO or Lone Star HMO because they do not match exactly.
- Is not equal to – Limits the results displayed to values in the selected column that do not exactly match the name you enter. For example, selecting this option for the Name column and typing Medicare would include all names other than Medicare.
- Starts with – Limits the results displayed to values in the selected column that begin with the text you enter. For example, selecting this option for the Name column and typing Lone Star would include names such as Lone Star, Lone Star PPO, and Lone Star HMO.
- Contains – Limits the results displayed to values in the selected column that contain the text you enter. For example, selecting this option for the Name column and typing Med would include names such as Medicare, Medicaid, and Texas Medical.
- Ends with – Limits the results to values in the selected column that end with the text you enter. For example, selecting this option for the Name column and typing Care would include names such as Medi care and TRI CARE.
- Type the value for your filter in the text box below the list.
- To add an additional filter for the same column, select a value from the second list and type the filter text in the second text box.
How To Topics
The menu on the left provides key concepts and step-by-step instructions that guide you through researching accounts.
The following topics provide key concepts and step-by-step instructions that guide you through researching accounts.